Power Query has over 600 native functions and the Power Query team keeps adding more and more.
I wouldn’t recommend memorizing them, but you do need to understand the concept of parameters and arguments in order to understand what functions are.
In this blog post I’ll go over what Custom Functions are and how you can create them. Be sure to check out Part 1 of this series before reading this one.
M Functions
You can get a list of all of the environment variables in your Power Query / Power BI by using a code called =shared (pound shared) in your formula bar as shown in the next image:

Nevertheless, even if the tool might have over 600 function, we still might need to create our own custom function to tackle repetitive tasks.
Instead of writing the same code over and over again, bottling it into a custom or user defined function for portability and time savings could be an amazing advantage.
See, the concept behind a user-defined or custom function is that you’re ‘canning’ a solution. A repetitive task that needs to be applied not to a unique query, but to multiple queries or incoming arguments.
It’s the same principle that you get from DAX when creating portable measures so you don’t have to define a SUM(Sales[Sales]) every single time you use a CALCULATE. You simply refer to that measure that you could call [Sales Amount].
The same principle that you get from Excel when creating UDFs with VBA – a repetitive task that could be simplified with just a simple function.
The difference is that you can get more than just a single value out of a function inside of Power Query. You can get a table, a list, a record, values or a combination of any and all of the previously mentioned.
The Scenario: Files with the same format, but different values
Imagine that every month we export a file out of our system that has the past month’s data.
All the files will have the same structure and format, but the values inside those files will be different because it’s a different month.
I’ve downloaded the files for January, February and March:

and what I’d like to do is simply create a function that I could later apply to any of the files that I’d like at any given point. Perhaps at a given point I could make my system export the whole year instead of just monthly data.

With this, we know that we need to create a function with only 1 parameter. That parameter must be the actual file that we want to transform.
You can follow along by downloading the sample files from the button below:
Custom Functions in Power Query / Power BI

There are 2 ways to create an M function:
- The manual way – where you need to manually step into the advanced editor to transform a query into a function
- The assisted way – where Power Query provides you with a framework to create functions instead of having to deal with the M code.
In this post we’ll go over both of them and then figure out which one provides a better experience overall.
Before we dive into it, let’s define the scope of what our function will do and the value that will be adding to our solution.
One of the files that you downloaded is an Excel file and within that file you’ll have one query that connects to the 01-January.csv file.
Note: you can import that query into Power BI Desktop by going through the Import from the File menu inside of Power BI Desktop.
The first thing that you need to do is edit that query and change the file path to be the one in your local computer. Simply click on the gear icon next to the Source step and point that to your local file.

Once that’s done, your query should load perfectly:

In short, these are the steps that were done for that query:
- Source – how we connected to the csv file
- Promoted Headers – promoted the first row to be the Column headers
- Replaced Value – we replaced blank values with null values on the Month column
- Filled Down – we used a fill down operation on the Month column
- Unpivoted Other Columns – unpivoted all the columns except the Month and Product Name
- Renamed Columns – the Attribute column was renamed to Market, and the Value was renamed to Amount
- Changed Type – set the data types for each column
Now that we have the query that we need, we need to transform that query into a function and assign a parameter to that function.
Manually Creating a Function
Just to keep things organized, let’s go ahead and duplicate that query and name it ManualFunction. Simply right click on the query and you’ll get the option to duplicate the query:

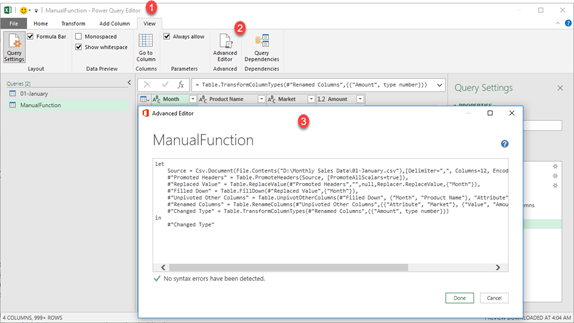
Once that’s done, we need to launch the Advanced Editor for that new query:

We first go to the View Menu (1), click on the Advanced Editor button (2) and then we’ll see the Advanced Editor Window (3).
I’ve highlighted the part of the code that we need to convert into a parameter, which is basically the binary of the file:

and then we have to manually change the code to look like this:

and once we hit Done it’ll be displayed with a function icon on the queries pane as it is now a custom function with 1 parameter (a binary) that outputs a table (as table).
Notice the difference between the 2 images. Prior to the let I added the function components:
(FileBinary as binary) as table =>
and everything else remained the same for that part that I highlighted in the first image which is now a function parameter.
Testing the Manual Function
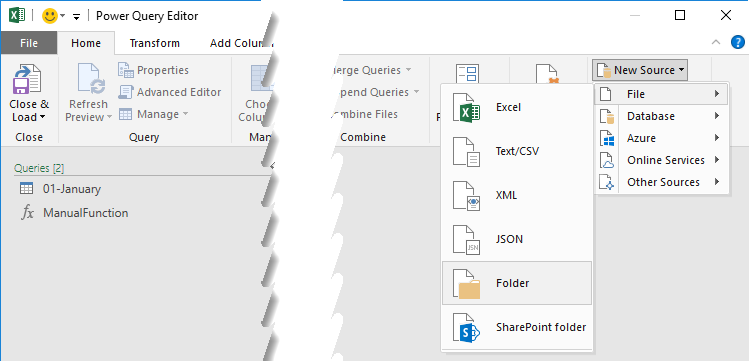
We have our function and it’s now time to test it. The way that we’re going to do that is by connecting to the folder that we downloaded – the one that has all of the sample files.
You can do that within the Power Query Editor:

and then click on Edit on the window that should pop up to land that as a new query inside the Power Query Editor.
The next step is to invoke your function against all of the files inside that folder by:

going to the Add Column menu (1), clicking on the Invoke Custom Function button (2) and then filling out that window as showcased (3).
You’re going to notice that some cells are yielding errors and the reason behind that is that we have some files that are not csv in there, so we can either filter those out before we invoke the custom function, by simply filtering by the extension to only have .csv, or we can do another filter where we simply get rid of the errors.

I highly recommend just going for the first option of filtering them out before invoking the function.
After I got rid of some columns that I didn’t need, here’s what I ended up with:

and the next step is to simply click on the double opposite arrows icon (also called the Expand icon) so we can get all of the data into just one table, essentially appending them:

and just to prove that everything is in our table, you can see it below:


 Miguel Escobar Published February 19, 2019


Great post, simplest explanation of manual approach I’ve seen.
This was great! I followed the steps and it works for all of my files in the folder except two. Because those two files have 1 column less on the left side of what needs to be unpivoted. Since I use the solution “unpivot other colums” I receive error in two files: “An error occurred in the ‘’ query. Expression.Error: The column ‘Column4’ of the table wasn’t found.”
Since the columns to the right (the ones that needs to be unpivotet) always change both names and and how many colums they are. I can not use the function “unpivot selected colums” at all.
Are you aware of any work around=
it depends on how you’d like to tackle it. Must users just separate the initial “from folder” query based on the files that they know. For the files that have the structure A, they’ll have a query where they’ll apply a function for that specific case. For all files that have a different structure, then they’ll have a different function that needs to be applied to those.
You could, if you know M code, create one function that takes into account both scenarios, but it does require a more advanced M knowledge.
If you’re willing to invest some time, you might want to try some error handling as showcased here: https://www.thepoweruser.com/2019/06/18/error-handling-iferror-in-power-bi-power-query/
One technique I like to use is a Column Header table. If you use it as the base of an Append with the imported file, the columns will be maintained. It will create nulls but they are easily dealt with.
Plus also you can safeguard against new columns coming in and breaking your load, do that by selecting all your columns and then remove other columns.
Hi,
This is very heipful, is there a way to have the outputs as separate files instead of a combined table?
You could use VBA to automate that scenario
This is a good example of how you could make that happen:
http://excelunplugged.com/2018/01/23/modifying-power-query-m-code-with-vba/
Thank you!
Although the VBA is a great example, the custom function nice as this would work in both Excel and Power BI.
Hello ,I tried following above steps to Manual function but for some reason when i try to format the Amount column it shows error to me. I am not bale to procced further.
hey! you can check the “Finished.xlsx” file to check exactly what I did and compare it with what you have. Hope this helps!
Thank you, it worked well !